Introduction
The GTN Open API uses REST standard HTTP verbs to communicate and returns a variety of HTTP codes and JSON messages to indicate the statuses and errors.
Step 1 - Configure Institution
Configure FinTech Institution at GTN
Institution for each FinTech will be created at GTN by the GTN administration.
Shared keys
GTN will share a specific app key and app secret for each institution. Additionally, you need to share your encoded public key with GTN.
GTN uses RSA public and private keys with a specific encoding mechanism
Generate Keys
Key Algorithm: RSA, Number of bits: 1024
- Java
- python
- JavaScript
private static void generateKeys() {

    String keyAlgorithm = "RSA";
    int numBits = 1024;
    try {

        // Get the public/private key pair
        KeyPairGenerator keyGen = KeyPairGenerator.getInstance(keyAlgorithm);
        keyGen.initialize(numBits);
        KeyPair keyPair = keyGen.genKeyPair();
        PrivateKey privateKey = keyPair.getPrivate();
        PublicKey publicKey = keyPair.getPublic();
        System.out.println("\n" + "Generating key/value pair using " + privateKey.getAlgorithm() + " algorithm");
        // Get the bytes of the public and private keys
        byte[] privateKeyBytes = privateKey.getEncoded();
        byte[] publicKeyBytes = publicKey.getEncoded();
        // Get the formats of the encoded bytes
        String formatPrivate = privateKey.getFormat(); // PKCS#8
        String formatPublic = publicKey.getFormat(); // X.509
        System.out.println("Private Key : " + base16Encoder(privateKeyBytes));
        System.out.println("Public Key : " + base16Encoder(publicKeyBytes));
        // The bytes can be converted back to public and private key objects
        KeyFactory keyFactory = KeyFactory.getInstance(keyAlgorithm);
        EncodedKeySpec privateKeySpec = new PKCS8EncodedKeySpec(privateKeyBytes);
        PrivateKey privateKey2 = keyFactory.generatePrivate(privateKeySpec);
        EncodedKeySpec publicKeySpec = new X509EncodedKeySpec(publicKeyBytes);
        PublicKey publicKey2 = keyFactory.generatePublic(publicKeySpec);
        // The original and new keys are the same
        System.out.println("  Are both private keys equal? " + privateKey.equals(privateKey2));
        System.out.println("  Are both public keys equal? " + publicKey.equals(publicKey2));
    } catch (InvalidKeySpecException specException) {
        System.out.println("Exception");
        System.out.println("Invalid Key Spec Exception");
    } catch (NoSuchAlgorithmException e) {
        System.out.println("Exception");
        System.out.println("No such algorithm: " + keyAlgorithm);
    }
}
from cryptography.hazmat.primitives.asymmetric import rsa, padding
from cryptography.hazmat.primitives import serialization
from cryptography.hazmat.backends import default_backend

def generate_keys():
    key_algorithm = "RSA"
    num_bits = 1024

    private_key = rsa.generate_private_key(
        public_exponent=65537,
        key_size=num_bits,
        backend=default_backend()
    )
    public_key = private_key.public_key()

    private_key_bytes = private_key.private_bytes(
        encoding=serialization.Encoding.DER,
        format=serialization.PrivateFormat.PKCS8,
        encryption_algorithm=serialization.NoEncryption()
    )
    public_key_bytes = public_key.public_bytes(
        encoding=serialization.Encoding.DER,
        format=serialization.PublicFormat.SubjectPublicKeyInfo
    )

    print("Private Key:", base16Encoder(private_key_bytes))
    print("Public Key:", base16Encoder(public_key_bytes))
const crypto = require('crypto');

function generateKeys() {
  const keyAlgorithm = 'rsa';
  const numBits = 1024;

  const { privateKey, publicKey } = crypto.generateKeyPairSync(keyAlgorithm, {
    modulusLength: numBits,
    publicKeyEncoding: {
      type: 'spki',
      format: 'der'
    },
    privateKeyEncoding: {
      type: 'pkcs8',
      format: 'der'
    }
  });

  const private_key_bytes = privateKey;
  const public_key_bytes = publicKey;

  console.log('Private Key:', base16Encoder(private_key_bytes));
  console.log('Public Key:', base16Encoder(public_key_bytes));
}
Encoding mechanism
- Base 16 encode
- Base 16 decode
- Java
- python
- JavaScript
public static String base16Encoder(final byte[] digestMsgByte) {
    final StringBuffer verifyMsg = new StringBuffer();
    for (int i = 0; i < digestMsgByte.length; ++i) {
        final int hexChar = 0xFF & digestMsgByte[i];
        String hexString = Integer.toHexString(hexChar);
        if (hexString.length() == 1) {
            verifyMsg.append("0");
            verifyMsg.append(hexString);
        }
        else {
            verifyMsg.append(hexString);
        }
        hexString = null;
    }
    return verifyMsg.toString();
}
def base16Encoder(digestMsgByte):
    verifyMsg = ""
    for i in range(len(digestMsgByte)):
        hexChar = digestMsgByte[i] & 0xFF
        hexString = hex(hexChar)[2:]
        if len(hexString) == 1:
            verifyMsg += "0"
        verifyMsg += hexString
    return verifyMsg
function base16Encoder(digestMsgByte) {
  let verifyMsg = '';
  for (let i = 0; i < digestMsgByte.length; i++) {
    let hexChar = digestMsgByte[i] & 0xff;
    let hexString = hexChar.toString(16);
    if (hexString.length === 1) {
      verifyMsg += '0';
    }
    verifyMsg += hexString;
  }
  return verifyMsg;
}
- Java
- python
- JavaScript
public static byte[] base16Decoder(final String hex) {
    final byte[] bts = new byte[hex.length() / 2];
    for (int i = 0; i < bts.length; ++i) {
        bts[i] = (byte) Integer.parseInt(hex.substring(2 * i, 2 * i + 2), 16);
    }
    return bts;
}
def base16Decoder(hex_string):
    bts = bytearray(len(hex_string) // 2)
    for i in range(len(bts)):
        bts[i] = int(hex_string[2*i:2*i+2], 16)
    return bytes(bts)
function base16Decoder(hex_string) {
  const bts = new Uint8Array(hex_string.length / 2);
  for (let i = 0; i < bts.length; i++) {
    bts[i] = parseInt(hex_string.slice(i * 2, (i + 1) * 2), 16);
  }
  return bts;
}
Step 2 - Authentication
Authentication
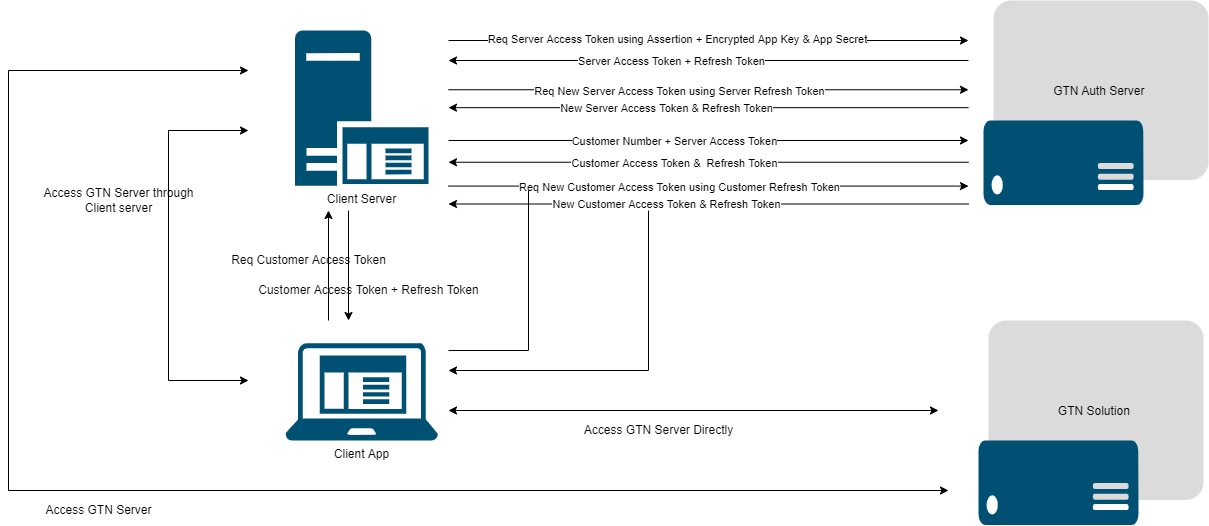
GTN authenticates the API requests using a JWT token which will be transferred to the header. This authorization header should be included with each request to use any GTN OPEN API. An error response will be received if the token is not included, or an invalid or incorrect token is used when creating an API request.
When architecting your system, it is important to note that the access tokens have 12 hours expiry time and refresh tokens have 24 hours expiry time, as indicated by the "expiresIn" and "refreshTokenExpiresIn" respectively in the response attribute. There are two types of access tokens:
- Server Access Token
- App key and app secret are required to obtain a server access token.
- App key and app secrets are static. When API access is provided, GTN will include a static institution- app-key and an institution-app-secret.
- Server access token is used to communicate between the client server and the GTN-server.
- Refresh token can be used to obtain a new access token when the access token is expired.
- Customer Access Token
- Customer number and the server access token should be used to obtain customer access token.
- Client application can use the customer access token to communicate directly with the GTN Open APIs.
- Refresh token can be used to generate a new customer access token when the customer access token is expired.
Step 3 - Customer Onboarding
Customer onboarding can be done using following end points,
- Customer registration end point
This end point can be used if KYC is done through AT (Admin Terminal). It creates registration request at GTN side and once the customer details are verified, AT functions can be utilized to create customer for the particular request.
- Customer creation end point This end point can be used to create customer accounts at GTN side without sharing the customer details with GTN. This does not require any approval process through AT.
Subscription package or customer profile can be defined at institution level using AT.
Customer profile - Customer profile is similar to a blue print of customer accounts. If this is enabled at the institution level all the customer accounts will be created according to that customer profile.
Subscription package - Subscription package enables to define the set of exchanges to which the exchange/ trading accounts should be created for a customer to trade. Exchange accounts will be created for all the exchanges defined in the subscription package and the cash accounts will be created according to the respective exchange default currency.
Step 4 - Account Management
This is to manage accounts at GTN side.
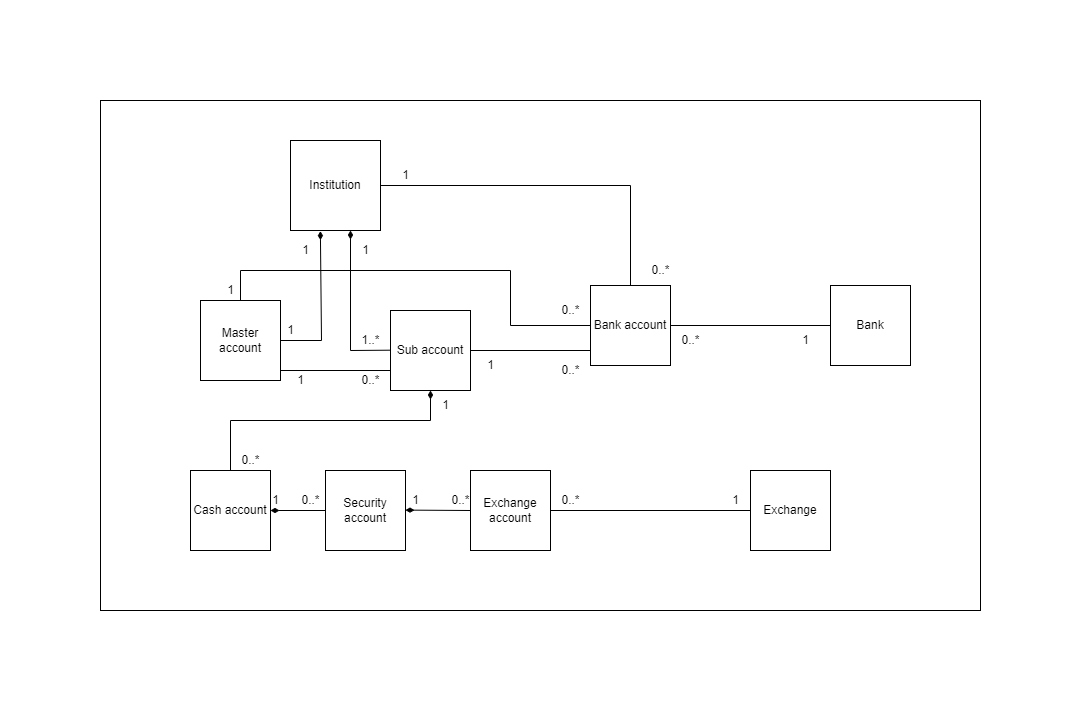
There are few account types
- customer account
- cash account
- security/portfolio account
- exchange account
- customer bank account
Account hierarchy
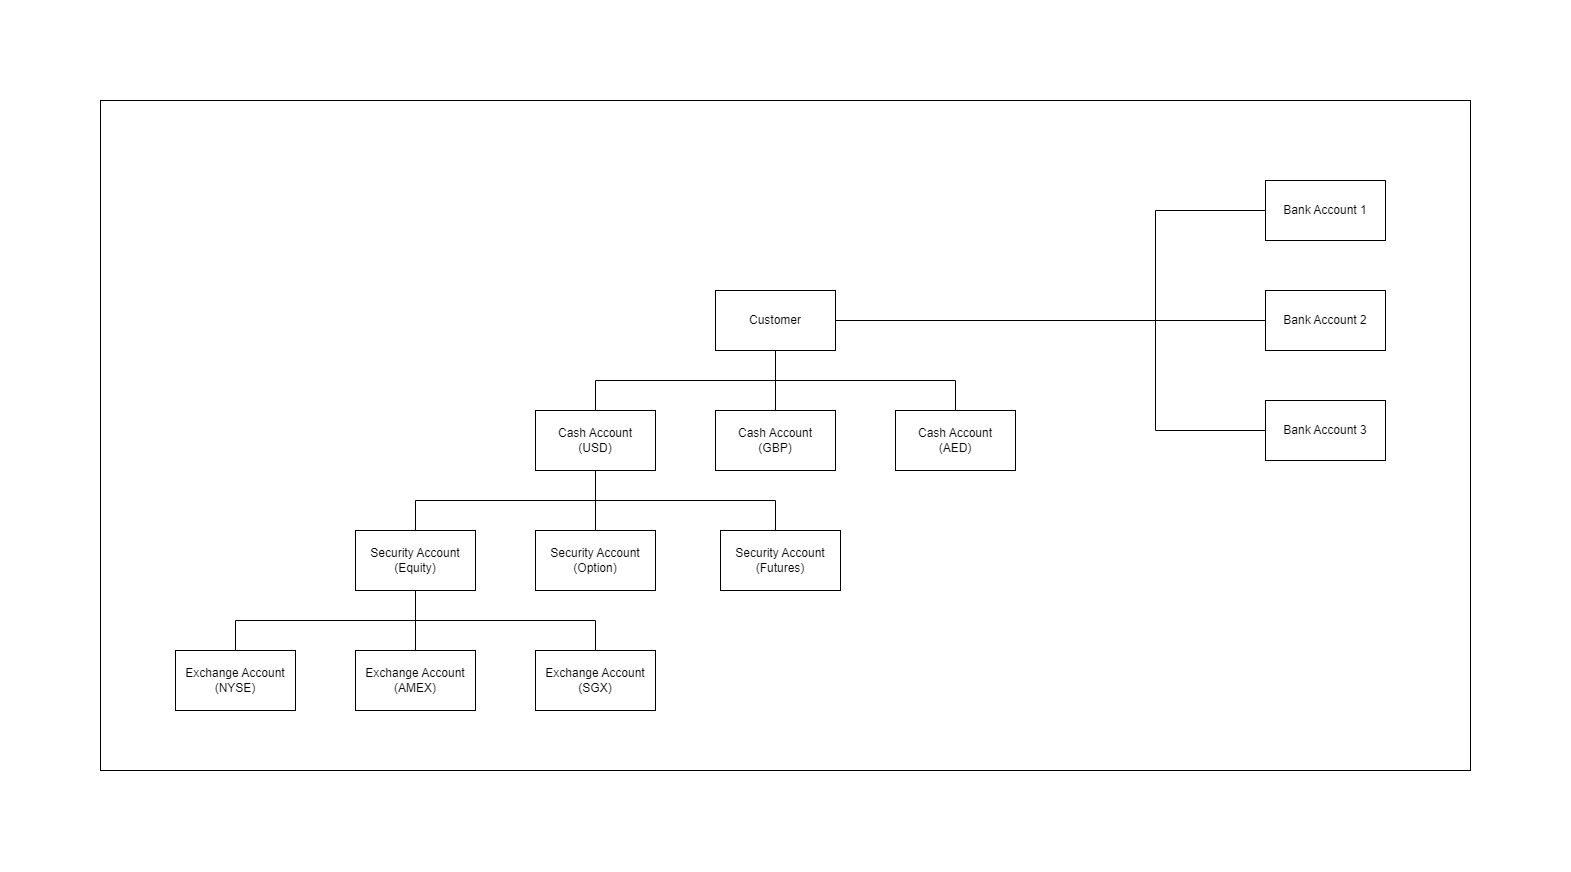
Sample scenario
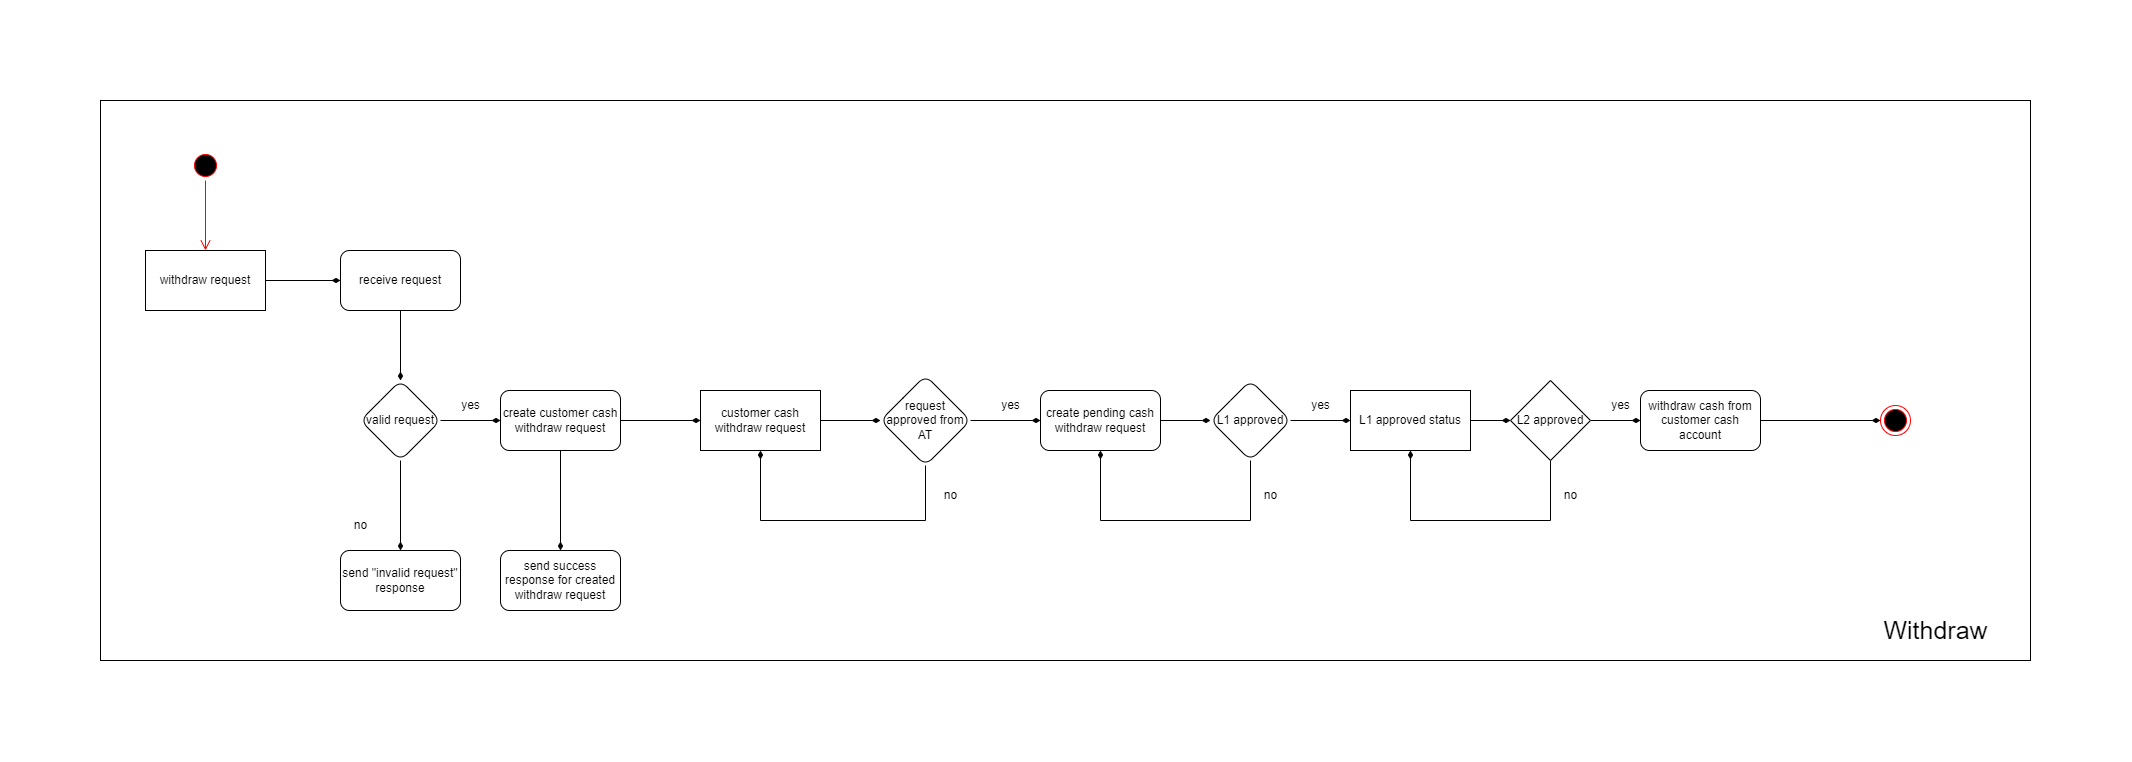
Deposit and withdraw Request
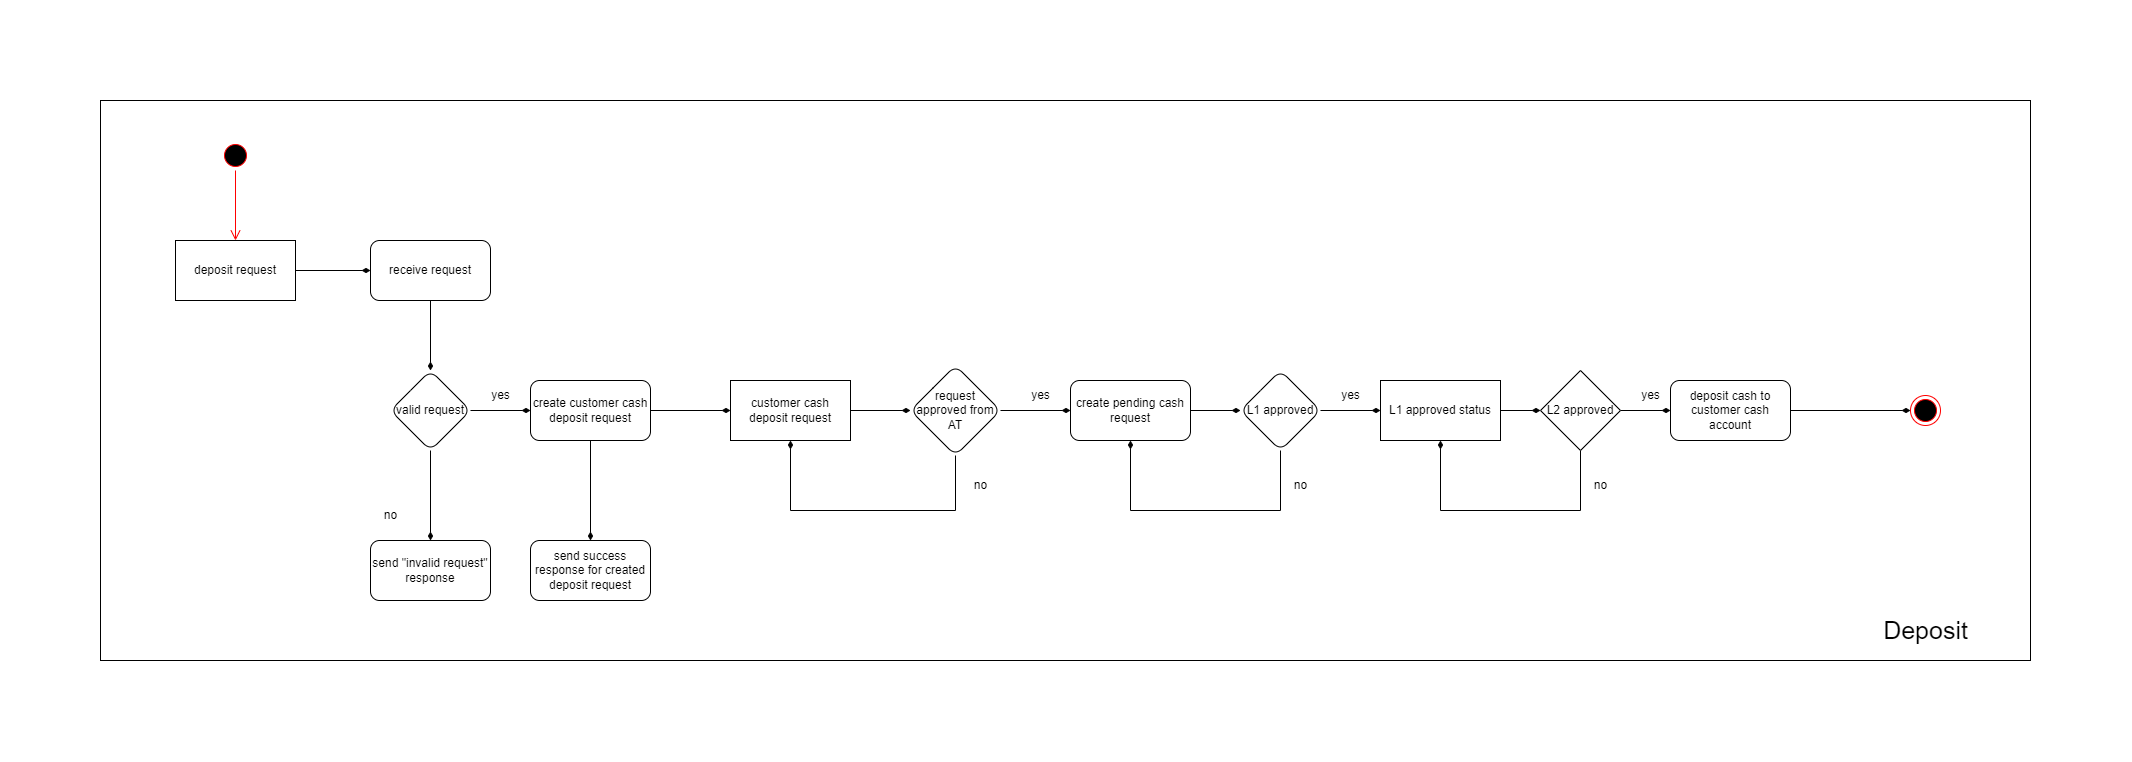
Note: Institution level configurations can be changed using Admin Terminal to approve deposits and withdrawals automatically without going through the approval life cycles.
Withdraw process - With approval life cycles
Deposit process - With approval life cycles
Step 5 - Trade Management
Following APIs are to manage Trades.
- create order
- amend order
- cancel order
Followings are to get commision or VAT.
- get commision
- get VAT
Below endpoints can be used to retrieve trade details.
- order search
- get order details
- get open positions
Step 6 - Market Data
These endpoints are to retrieve market data.
These endpoints can only be called using customer token.